Tuesday, April 28, 2009

Practice Makes (Close Enough to) Perfect (For Me)


Meet Motif #2 (Minitats #6 by Patti Duff) who I have dubbed Close Enough. One Ring is a little askew. I must practice the folded join more - MUCH more. It got very confusing for me because there are two joins between each ring. The double stitches between the last two joins got lumpy and twisted. But the rest of it turned out nicely. So I'm going to look at this motif as 5/6 good instead of 1/6 bad - perhaps now I will be accepted into the Optimist Club.


And now #2 is ready for its close-up.

Sunday, April 26, 2009

Be Careful What You Ask For...


I should have been more careful. I asked My Dear when we could talk about hanging the rods for the curtains in our bedroom the other day. I forgot that he is a man of action. Within five minutes the ladder was out and he was marking the wall to drill. You can tell by the picture though that we probably should have talked a little more before leaping into action. There are a couple extra holes... totally not MY fault, of course. I am clear as a bell with my instructions - do you hear crickets again? I was afraid of that...

Anyway, I am now cleared in hot to start working on the curtains! Wow, that's great... except, I don't really WANT to work on them. I have a mental block I suppose. It's a lot of fabric and although I got it half off with a coupon, it STILL cost more than one pretty penny! I don't have too many mental blocks - drapes, pot roast, zippers, buttonholes (although I am overcoming the last two). At least I can leave the house and I'm not a TOTAL germaphobe.

So here is a list of my fears in undertaking this project:

> I will measure wrong and mess up many yards of pretty penny fabric.
> The serger will make a feast of the sheer fabric.
> They won't hang straight, and like crooked bangs, I will adjust them away to oblivion.
> There won't be enough fullness.
> The black out lining will be difficult to work with.
> I won't like them when I'm done.

and probably worst of all...
> My Dear won't like them.

I plan to work on them this week, come what may. Here's hoping it's all in my head!

Saturday, April 25, 2009

Not Letting Any Grass Grow Under My Feet


Look what I did today! Well that and a trip to the doctor and two pharmacies for Baby Doll... But check that little beauty out! It only has ONE thread coming out of the back which means I HID MY BEGINNING THREAD!!! AND it's a good shape, so I guess I can stop practicing in the pickup line at school and put it to use!


DESIGN FLAW
Although we have a VERY nice doctor, I didn't take Baby Doll there for an outing. She woke up barking like a seal. She has allergies. So I had to dust off the old nebulizer. I got this cute new mask for her to use (actually this is all they had). It has a dinosaur face on it so kids will like wearing it. It should come with a mirror though, because as soon as it goes on Baby Doll's face, she screams and screams. So I get to wrestle down an angry, red T-rex every four hours or so. At least the medications going through it are working even if the "fun" aspect of it is a total failure.

(actually this all happened YESTERDAY, thank goodness, or it would have involved the emergency room)

Wednesday, April 22, 2009

Waiting for the Judges' Ruling...


Can this sad, misshapen, tatted flower motif which only resembles, in part, the image presented next to its pattern (Minitats by Patti Duff, motif #6), with its thread ends dangling and not even tied together, count as #2? (casual whistling, feet shuffling, hands in pockets, head cocked to the side and eyes averted)

errrr ... no. We have to maintain standards after all.

But I did learn some stuff to pass on to future me (because if I don't do something for a while, I forget the details that made it work in the first place). I will not even attempt to explain tatting (I have some links to good tatting demos over on the left), but basically tatting is a series of two step knots (double stitch) and spaces between the knots (picot) which are used to make rings and chains which are then joined together. Anyway, this pattern showed me that when I join one section of tatting to another, it works better for me to treat the join as the first half of the double stitch and then do the second half of a double stitch to continue on. When I tried to do a full double stitch after the join, there wasn't enough room and the ring I was working on bunched up. Also, I realized once again that I need to work on hiding the beginning and ending ends of thread and figure out how to do a folded join which is needed at the end of some patterns or I will be tatting the same bookmark for the rest of my life.

So I've been working on my tatting to-do's at school pickup and doctor appointments this week and I can now hide my beginning ends. Baby steps...

Saturday, April 18, 2009

There Are Those Who Would Call It Corny, But I Call It...


...my favorite book. I found a copy of The Rosary in my tiny high school's tiny library. I loved it. I found it again years later in my huge college's huge library. I checked it out expecting nothing really, and loved it again. I got it through interlibrary loan a few years later after my second child was born... still loved it. Then ebay rode to my rescue and helped me get the copy I have today, which I pull off the bookshelf at least once a year because it is still my favorite after all this time and all those readings.

I have been thinking of it because of the buzz the last few days over a lady from a small village in Scotland with a wonderful voice. The Rosary is about a plain Jane (literally, her name is Jane), loved by all the guys as one of the guys, who gets to know a handsome, younger man who is an artist and is well known as a great admirer of all things beautiful. They are nothing more than chums until one night when Jane sings The Rosary at a house party given by her aunt and the artist hears her glorious voice and glimpses the beauty of her soul. And that is just the beginning because it is a melodrama after all and the road to true love is never allowed to run smooth. All right, I will admit that it IS corny, but I'm willing to pick a few kernels from my teeth...


I finished my bookmark! This is the first time I have tatted with two shuttles. It was fun! The pattern is spiral bookmark by Rita Weiss. She adapted it from edging #1 in Tatting Doilies & Edgings, Dover Press. I think it turned out well, but I realize I need to learn to hide my beginning and ending threads properly. My tassel looks clumsy because I was trying to hide them with it. So that will be my next goal.

The tatting blogs I enjoy reading always mention a challenge to tat 25 different motifs in a year. I imagine if I really did it, I would be a pretty good tatter at the end of the year. I'm not ready for the official challenge, I'm just going to keep track and see how many things I make (it may be two, who knows). So the spiral bookmark is #1.

Friday, April 17, 2009

Things COULD Be Worse...


Groovy Girl's cast COULD be REAL...but thank goodness it is not! We went to the Family Jamboree at the school tonight and the big hit of the evening was going to the nurse's office to "break" your arm. There were kids all over the school with casts. Go figure... Groovy Girl made a miraculous recovery within an hour. She needed to color and even though she is right-handed the cast was in the way. Since it had hardened, I had to soak it a bit to get it off. Gotta admit, it WAS pretty ding dang cool.

Friday, April 10, 2009

YOYO MA...ma


It would seem that I am bag obsessed these days. I had not planned another bag project so soon, it just sorta happened. I bought this cute little straw bag for Baby Doll. She LOVES to carry Groovy Girl's purses around, so I thought this would be an instant fave. But when I got home I realized the flower was not as sturdy as I thought and then I caught site of the tag that read, "PRODUCT NOT INTENDED FOR CHILDREN UNDER 8 YEARS OF AGE." 8?!? That's a new one on me! Since Baby Doll isn't even 2 yet, I decided to do the only wise thing... rip the flower off and decorate it myself, with YOYOs!!!! And I just HAPPEN to have a cool gadget! What were the odds? Pretty good with me, I guess, but let's not judge.


I've had this doodad for a while now. I have thought about using it on purses, blouses, t-shirts...that about covers it. I hadn't actually tried it yet though and when I read the instructions I was confused (and that was after I finally found the English version). It seemed simple enough after you got going but the first couple of stitches made no sense to me. So I did it my way (feel free to sing) and I have no regrets.


The finished diameter of these yoyos is 1 inch. I had some really pretty charm squares I bought in a pack a while back. From each square I was able to get 2 yoyos (I only needed 10 total). The yoyo maker has two parts. One is shaped like a ring and has three tiny knobs sticking off the outside edge. The other is solid and has three lines marking it. Taking care to align the knobs and lines on the yoyo maker pieces, sandwich your fabric between the two, right side facing the ring side. Pop the solid piece into place. It is important to match the knobs and lines so the holes you will be sewing through will line up properly.


Trim 1/8 to 3/8 inch away from the edge. This will be your seam allowance. Caution: The next couple photos contain graphic material of a stomach turning nature - a vivid illustration of dry hands and unmanicured nails. Just be thankful I didn't have to use my toes! Really.


This is where I found the instructions confusing. But then with four kids, I am easily confused. Let's face it, my mind is mush. But I digress. This may or may not be the "right" way, but it worked for me! I knotted my thread using a quilter's knot (an easy way to make a bulky knot which won't pull through the fabric). I picked one of the lines on the solid yoyo maker part as my starting place. From the solid side I felt for and inserted my needle into the first hole to the right of the knob and through both parts of the maker. From now on you will be holding the maker with the ring side facing you.


Proceed counter clockwise and insert needle into the next hole to the left being careful to hold the seam allowance down from the back so your stitch will catch the fabric. Keep holding that fabric down on the back and stitching around the entire perimeter. Your stitches should disappear as you pull them taut. If there are loops between the scallops on the ring side of the maker you will be unable to remove the fabric.


And here is the reason I suggest starting at one of the knobs - it makes it easier to know when to stop. As I stitch, I keep track of the knobs like mile markers and when I get back to my starting point I take one more stitch which will overlap with my first stitch. DO NOT TIE A KNOT!!!


Pop the yoyo maker pieces apart and gently pull the fabric off of the solid piece. DO NOT TIE A KNOT!!!


Pull the thread gently to gather the yoyo, encouraging it to form a circle. The seam allowance will roll inside. You may need to fiddle a little to get the folds even. NOW, you can make a knot! I run the needle back through a couple folds and into a crease, then clip the thread close to hide the knot.


PURRRRDY!!! I made 10 of these babies and then whipstiched (3 stitches per adjoining edge) them together. Here they are stitched on the bag.

Hold it up for me Baby Doll!


Thanks... Let me borrow it a second...


AHHHH!!! Sweet and not nearly the choking hazard... but I'm NEVER going to show the before photo to Groovy Girl, because she is nothing if not brutally honest, and this version does not have NEARLY enough bling to satisfy her!

UPDATE: Baby Doll must actually LIKE her new purse. I told her we were going bye-bye earlier and she ran to get her purse and stand by the door. Oh, I'm SO working on her dress first!!!

Tuesday, April 7, 2009

Forget Papa...Mama's Got a Brand New Bag!


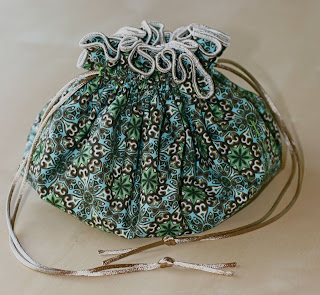
Thank goodness the second time was the charm, because I was going to chuck it in if it didn't work this time! But it turned out beautifully if I do say so myself and I DO!!!

Amazingly I had the forethought to make a pattern out of freezer paper of the circles I used so I will be able to make another bag easily when this one wears out or I get tired of the fabric. But I LOVE this fabric so it will probably be thread bare when I'm done with it. So yes, I have a pattern now, but there is a very real possibility it will get lost if it isn't already. With that in mind, here are the dimensions:

2 Large Circles - 17 inches diameter (use the same or contrasting fabric)
2 Small Circles - 12 inches diameter (use the same or contrasting fabric)
1 Fusible Fleece Circle - 5 inches diameter


I tweeked the bag construction also. NO BIAS TAPE THIS TIME!!!!

Here's the drill:

1. Mark a 1/2 inch long button hole on one of the large circles (this will be on outside of completed bag) perpendicular to the edge and 1 inch from the edge. Mark a second buttonhole on the opposite side of the circle. Try to be fairly precise in placement and length of buttonholes because they will be connected with sewing lines in a step or two. Sew buttonholes and rip open.


2. Pin the two large circles together, right sides outward.

3. Create a channel for the satin cord. Beginning at a buttonhole stitch from the edge closest to the outer edge of the circle around the entire perimeter of the circles (through both thicknesses) being sure to connect to the second buttonhole. Stitch a second time around the perimeter starting from the inner edge of the button hole.


4. With a rolled hem stitch, serge the edges of the large circles together. I used regular thread in the right needle and the lower looper and sulky thread in the upper looper. Tension was 7 for the lower looper and 4 for the needle and upper looper. I haven't had a class yet on how to use my serger properly, so I'm winging it. It is ALWAYS a good idea to practice on a scrap of the fabric you are using first. This time I disabled the blade and went around the edge twice. I was very happy with the result. NOTE: When serging the edge, place circle on machine with the buttonholed side up so the pretty side of the serged edge will be on the outside of the completed bag.


5. Technically, one side of each of these serged circles is the lining. How you proceed will make a big difference if you chose to use contrasting fabrics for the lining. The lining for the large circle will be the inside wall of the bag. The lining for the small circle will be the inside of the bag's pockets.

6. Pin small circles together, right sides out. Put circle on machine, lining side down, and serge edge as with large circles.

7. Center the fleece on the lining side of the serged small circles. Fuse according to manufacturer's instructions.

8. Center and pin large circles to small circles, lining sides facing.

9. To create the inside pockets, think pie (as in cherry or whatever flavor you prefer - I like pumpkin) and mark 8 sections on small circle with chalk or other fabric marker. Sew along marked lines through both circles. NOTE: Sew only from edge to edge on the small circle.

10. To finish bottom edge of inner pockets, feel for edge of fleece, mark edge and sew along marked line.


11. Finish bag by running two lengths of satin cord through channel created on outside of bag. You will begin and end a cord through each button hole. NOTE: To prevent bag from lying flat when opened, open bag as desired (I think mine opens about 90% of the way) and knot satin cords. When bag is closed the cords will be long enough to use as handles.


I think it is the PERFECT bag for me to carry my tatting in! Funny thing though - when I was showing it to my friend (yes, I have ONE - quality over quantity), she said she used to have a travel jewelry bag like that...Do you hear crickets chirping or are they just in my head? I was afraid of that... So the proper title of this series of posts should be "How to Turn Your Perfect JEWELRY Bag Into Your Perfect TATTING Bag". Mom probably thought I would KNOW what the bag was for and if I ever mentioned it being a sewing bag, she probably played along. She was a very indulgent mom and often gave me too much credit. She has either had her chuckle or is having it now...

Note to self: When your bag wears out and you are making a new one, try making your own bias (use your cool tool) to finish the circle edges - and DON'T BE AFRAID OF COLOR!!!

Monday, April 6, 2009

Budding Artist

Today Baby Doll flexed her artistic muscle.  
She shows a great deal of promise don't you think?

Saturday, April 4, 2009

Irreconcilable Differences


I was SO happy when I took this photo!  Making bias tape with this gadget is so much fun!  (no, I'm not as old as I sound)  I just love gadgets and if they work...well just PINCH me!  Little did I know, this lovely bias tape would contribute to my bag's downfall (cue forebodeing music)...


Another photo, another gadget.  I don't know what this thing is called but it is dandy for pulling cords through casings.  Safety pins step aside!  There's a new sheriff in town!  I've had this for a while and I no longer fear elastic...enough said.  So you see one section of my gorgeous bias tape.  I would go on to add three more sections, but that would ultimately prove to be four too many sections...

Bring up the music and let's go in for a close-up...


It turned out pretty right?  I like the contrast of the bias tape I had so much fun making and the satin cord is so pretty and matches PERFECTLY.  So what's my problem...where do I start?

I wanted a big bag and that is what I got, but TOO big this time!  The other problems involve my lovely, backstabbing bias tape.  The tape is a little too narrow and so it is VERY hard to pull the bag closed, although my biceps are getting toned.  Also, I did not account for the fact that adding the bias tape put two more layers of fabric on the bag which would be gathered when the bag is closed...and as a result...the bag DOESN'T close completely!  

I tried to get past these flaws, I even loaded up my stuff and... sure it fit nicely... and I LOVE that inside floral pattern...


but in the end our differences proved to be too much to overcome.  Lucky for me, Groovy Girl admires different qualities in her bags and really liked this one.  So I wish them well and am still dreaming of finding/making that perfect tat bag...to be continued.

Friday, April 3, 2009

Bag Taking Shape


I've been working on the bag a bit and just realized it is almost done!  I pinned the circles together and sewed through all thicknesses to create the eight inside pockets.  I had thought I would use rick-rack to accent the pockets, but decided to keep it simple for once.  For me, keeping it simple is quite a feat.  I like to add details in my mind's eye which are often too difficult and impractical to actually carry through.  So yeah me!  I've JUST started and I'm ALMOST there!!!

Thursday, April 2, 2009

When You Can't Sew...Spend Some Dough

It's been a busy week... although I can't really remember why but I'm sure it was really big AND important... so I didn't get to do much sewing until the last couple days.   But I was not idle.  I went back to Joann's for sheer fabric to go with the curtains.  I also got curtain rods.  So now the ball is in Mister's court.  He needs to put up the rods before I get started.  In the past I have had the curtains done before  the rods were hung, but something always went wrong and the rods couldn't go where I had envisioned, and I usually ended up with high-water drapes.  Not this time!                                                                                                                                                                                                                                            

Then I decided my tatting bag really was too small and that I was going to go ahead and make a new one.  The final straw was when my crochet hooks poked through the side of the bag one day.  So I picked some fabric from my stash (sunk cost) and got some satin cord (nominal expense) and sulky thread (bam! there's the money).  Sulky thread is not cheap, but it will go a long way and I got ecru, a good basic color (back to frugality).  Here are the fabrics I picked.


I cut two large circles (22 inches in diameter) of the pink dotted and one smaller circle (16 inch diameter) each of the floral and the pink check.  I also cut a circle of  fusible fleece (8 inch diameter) which will give the bottom body and shape.  I had added about an inch to all the diameters, except the fleece, to account for the amount which the serger would cut off.


Then I serged the two pink dotted circles together and the floral and check together.  I used the rolled hem stitch with regular thread in the right needle and the lower looper and the sulky thread in the upper looper.  So I can remember, the tension on the lower looper was 7 and it was 4 on everything else.  I also slowed the feed to .7.  The edges look pretty nice.  I like the shine of the sulky thread.  I would have liked them to be fuller and tried to use woolly nylon in the upper looper but I couldn't get the tension set right and got frustrated from picking the thread out of the machine and starting over.  But next time...


I fused the fleece to the pink plaid which will be the floral's lining in the bag.  That's where I knocked it off for the day, so I'll just say: To Be Continued...hopefully soon!