Thursday, July 29, 2010

Out, Damned Spot!


While I LOVE Mary Konior's book, Tatting With Visual Patterns, this edging turned me into a CRAZED LUNATIC - or - maybe just a snappish mother.  Downright feisty.  It was time for it (meaning the photocopy I made to carry in my purse, not the book for goodness sake) to go out with the rubbish and the banana peel my oldest tossed on it right after this photo was snapped prevented me from having any second thoughts...


Good thing I didn't toss my shuttles in the bin as well, because these arrived on my doorstep later in the day.  Tatting from Burda and A Tatter's Workbook, as well as bobbins which I hope will fit my Pop-A-Bobbin shuttles.  What BEAUTIFUL books!  I love having something new to peruse!  That for me is "such stuff as dreams are made on."

Thursday, July 22, 2010

Love This Book, Love This Pattern

As a little girl, sitting on her grandfather's knee and listening to his stories of faraway places, Miss Alice Rumphius vows to travel the world and return home to live by the sea.  Her grandfather urges her to make one last promise, and that is to "make the world more beautiful."

As a grown lady, Miss Rumphius does indeed travel and after hurting her back riding a camel decides it is time to make her home by the sea.  But finding a way to "make the world more beautiful" proves to be the hardest promise to keep.  However, the Lupine Lady, as Miss Rumphius comes to be called, will do just that...

MISS RUMPHIUS, by Barbara Cooney, is one of my FAVORITE children's books.  It's a sweet, simple story and is BEAUTIFULLY illustrated.

To make this edging called Lupins from Mary Konior's book, Tatting With Visual Patterns, I needed to learn roll tatting.  There are some simplified instructions on roll tatting on the same page as the Lupins pattern, as well as tutorials on the web.  After the fact, I also found roll tatting addressed in The Complete Book of Tatting by Rebecca Jones.

For me, roll tatting was a little tedious in the beginning and I wasn't at all impressed with my first efforts.  It's "rolling" right along now, so I decided to put together a "how to" of my own so I will be able to remember what worked for me as it isn't an element I typically see being used in tatting patterns and it may be a while before I try it again.

This is how I roll...


Roll Tatting


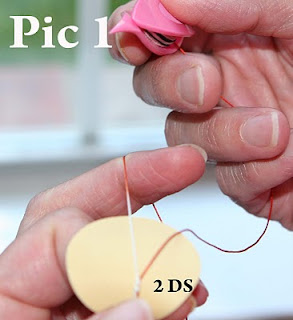
Before adding roll tatting to a ring, it is necessary to make at least one DS to anchor your rolls.  I have done 2 blurry DS to begin my ring in Pic 1.  I have been using a needle puller to help control the thread as I begin adding rolls.  The needle puller is a rubber disk used a lot in hand quilting to pull a needle loaded with several stitches through the layers of a quilt.  For this purpose, it grips the DS and completed rolls from beneath and makes it easier to control them in the pinch.


To make the rolls, hold the carrying thread* taught and pass the shuttle under the carrying thread (Pic 2).  Bring the shuttle up and over the carrying thread and repeat for as many rolls as you wish to add at one time.  Although I have read that adding 3 or 4 rolls at one time is recommended, I like loading up and have done as many as ten rolls at once.   *I'm defining the carrying thread as the thread between the pinch and middle finger of my left hand, where the DS are usually worked.


In Pic 3 I have tatted 2 DS and loaded 10 rolls.  I am still holding the carrying thread taught.


In Pic 4 I have flipped the ten rolls by relaxing the tension on the carrying thread and pulling the shuttle thread taught (like flipping a regular DS stitch).  


(Pic 5) At this point I usually drop my shuttle to hang while I continue holding the shuttle thread taught with my right hand middle, ring and pinky fingers.  A little tension is required on the carrying thread to keep the rolls from rolling back on themselves while my right hand pointer finger and thumb begin scooting the rolls toward the DS.  Speaking of DS, don't forget to keep a good grip on them and try to keep their heads up (or "fancy pants" down) as you work with the rolls.


You can't really tell it, but Pic 6 is an ACTION shot!  I am "massaging" the rolls between my thumb and  pointer finger in a  counter-clockwise or "lefty-loosey" direction to work out lumps as I continue scooting the rolls toward the DS.  The motion is much like winding a watch, except going the opposite direction.  Be careful not to roll too tight so you won't have difficulty closing the ring.

OH NO!!!  The DS have flipped heads down.  I'll need to fix that before I close the ring.  


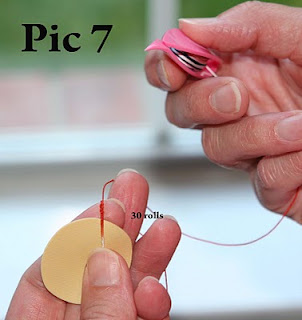
In Pic 7 I have added two more sets of 10 rolls.  I prefer working with larger sets of rolls because I find them easier to control as I get them into the pinch.  I have also stitched 2 DS to anchor my rolls.  Always make a DS after you have completed the number of rolls a pattern requires for a ring.


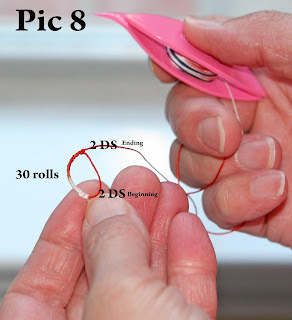
In Pic 8 I have begun closing my ring.  Before you begin closing a ring with roll tatting, make sure all your DS are heads up and your picots are to the outside of the ring.


Here is my completed ring (Pic 9).  The first ring is hardest for me because the rolls want to twist more.  The needle puller helps me control that.  I didn't put a picot in this ring although I would imagine most patterns would call for one so you can connect rings.  Once a pattern is underway, the previous tatting helps subsequent roll tatting not be as twisty.  At that point I find I no longer need the needle puller.

And that's the way I roll...

Thursday, July 15, 2010

Groovy Girl's Hoop Dreams


Groovy Girl taught herself the back stitch while making a pillow for my husband on Father's Day.  This week she was looking for something to do so I suggested she try red work.  Here is the result.  I'm VERY proud of her!  She is figuring it out as she goes.  That's the way this girl rolls.  She wants to do it herself or not do it at all.  She is planning a quilt for Baby Doll.  Lucky Baby Doll!  We all want to make stuff for her!!


Sunday, July 11, 2010

A President, The King, And A Guy in His Garage

(Patchwork by Mary Konior, Tatting With Visual Patterns
#6 of 25 Motif Challenge)

Our family just got back from a trip to my husband's home state of Tennessee.  While there, we did a little daycationing from his home town.

********************

First we visited The Hermitage, President Andrew Jackson's home near Nashville, on a BEAUTIFUL day last week.  The house tour was interesting but I REALLY enjoyed strolling the grounds and looking at the flowers.


The tomb of President Jackson and his wife, Rachael, is lovely and peaceful.


OF COURSE, Baby Doll's favorite part of our visit to The Hermitage was the chicken which wanders about outside the gift shop.  After she asked her farm-raised and subsequently horrified mother, WHAT IT WAS, she had a great time chasing after it.  But once the tables were turned and she found it making its way toward HER, she tucked her little feet up under her dress and scooted to the other end of her bench.

********************


After the best chocolate shake I've ever had at Elliston Place Soda Shop, we went to the Parthenon.  It is AMAZING to see something like this near downtown Nashville.  It is a full size replica of the Parthenon in Greece.  I'll have to email these pics to my brother who took his family and my sister-in-law who went with my oldest niece to visit the "real" Parthenon this summer.  Won't they be GREEN WITH JEALOUSY that MY Parthenon wasn't all OLD and CRUMBLED!!!


Inside, you will find Athena, a goddess worthy of a role in Attack of the 50 Foot Woman.  She is SOMETHING!  You can't tell very well from the picture, but she is wearing some SCARY big flip flops...


SERIOUSLY, the Parthenon is pretty cool.  My college history teacher said she scoffed when she heard about it, but ate her words when she went.  She had visited the Parthenon in Greece and was amazed at the detail of the replica in Nashville.  In fact, she spoke so highly of it, it has been on my mental list for all these years.

********************

The next day, we enjoyed some time in Memphis.  Had some great barbeque at The Rendezvous and had fun soaking up the atmosphere of the place until one of our friends pointed out that we were in the basement of a 100 year old building which sits on the New Madrid Fault... gulp!  So what is a person to do?  FINISH YOUR RIBS, that's what... and better polish off the beans and coleslaw as well.

But before dinner we went to Graceland, the home of the King of Rock 'n' Roll, ELVIS PRESLEY.

Although it was very different from what I had been expecting, Graceland did not disappoint.  The home is a modest size by today's standards.  I know quite a few people who haven't even had ONE record go gold who live in bigger houses!  Its decorating style is like a flamboyant seventies time capsule.  Although there were too many visitors to take in too many details, you could still pick up good vibes from the place.

The tour answered one of my longtime questions - WHY IS IT CALLED GRACELAND?  The answer was simple.  The couple who built the home in the 1930's had inherited the land from an Aunt Grace, so they called it Graceland.


This is the formal living room just inside the front door.  You can see the arm of a white sofa on the right which stretches 20 feet across the room.


In the basement TV room, just out of shot, the letters TCB with a lighting bolt are painted on the wall - Taking Care of Business In a Flash.  DH was trying to get a shot of Elvis's stereo system.  I guess that is it back in the corner...


I liked seeing many of the costumes Elvis wore in the movies and concerts displayed on mannequins with attitude.


And this is the pool.  As we walked in the backyard, it was fun to imagine Elvis and Ringo Starr playing football there (I had just heard Ringo talking about it on Elvis radio as we drove into town).  I didn't visit the graveside.  I guess I've joined the ranks of the many who wish he wasn't really there...

********************


We usually vacation by car, so a large part of my trip preparations is spent picking what project(s) to take  along.  This year I chose Tatting With Visual Patterns by Mary Konior.  I spent most of the trip working on Patchwork.  The motif pictured here was never finished because as I neared completion of it, I nodded off... when I awoke, I proceeded to make a disastrous join which turned my square motif into a triangle and didn't notice my mistake until I had made more stitches and rings than I cared to remove.  

MORAL:  Don't tat within thirty minutes of a nap or your brain will cramp and your motif will sink.

I gotta say, as irritating as a fumble like that can be, my frustration was lessoned by my new shuttle from I'm In The Garage.  Before this shuttle, I had only tatted with clovers.  The Pop-A-Bobbin took a little getting used to and a little time to break in, but BOY-OH-BOY, I LOVE tatting with it!  I used a clover for just a little while on the trip and had to switch back!

Besides working on Patchwork, I reacquainted myself with clunies and tried some roll tatting.  I'm practicing roll tatting with Mary Konior's Lupins edging.  As awkward as the cluny loom feels, I find holding the wraps of roll tatting more difficult.  They REALLY want to twist and I feel as though I'm going to sprain something while I fend them off with a chair hold them in the pinch of my fingers.  I'll keep working and maybe I will have something more than this to show for it sometime...